


Time Machine For PC Windows 7/8.1/10/11 (32-bit or 64-bit) & Mac
The other way to restore Time Machine backups on Windows is by using third-party tools that can read HFS, HFS+, and HFSX file systems. Luckily, few such tools are available in the market, and some come with a price tag. Windows 7/8.1/10/11 and OS X are two different platforms, technically, we can only view all the Time Machine backups and their files using these tools, but we can not restore settings or applications. However, you can manually export all your files from Time Machine backups to Windows 7/8.1/10/11 with the software programs that can read drives formatted in the HFS+ files system.
How to Access and Restore Time Machine Backup Files on Windows 7/8.1/10/11
Time Machine For PC backups is a powerful and valuable feature every Apple users prefer to secure their personal and professional data. Being a developer, I regularly commit my code to BitBucket for backups and to safeguard personal files and memories; I use Time Machine backup every week. I will connect my 1 TB WD passport external hard drive to Mac, and it creates the latest backup every time. Everything looks good from the outside, but the real problem is when you want to access Time Machine backups on a Windows 7/8.1/10/11 PC or laptop. Recently my MacBook Pro refused to power on even after PRAM, NVRAM, and SMC reset, and I switched to a Windows 7/8.1/10/11 laptop till it got repaired.
When I tried to connect my external hard drive, Windows 7/8.1/10/11 failed to detect it since Mac formats the hard drive in HFS+ format while creating the first Time Machine backup. Unfortunately, Windows only supports NTFS and FAT32 file systems and can not detect Mac-formatted hard disks and disk images. The one way to connect your Time Machine backup drive to Windows 7/8.1/10/11 is by formatting it in any Windows-supported file system. But formatting will permanently delete all Time Machine backups, and we don’t want to do this.
Copying Time Machine Backups to Windows 7/8.1/10/11
HFS Explorer from Cotacombae and HFS+ for Windows by Paragon are two popular software for Windows 7/8.1/10/11 to read HFS, HFS+, and HFSX file systems. The former is a free tool with a primary user interface but requires Java, whereas the latter is a more advanced HFS+ reader with a rich interface but comes with a price tag. However, HFS+ for Windows 7/8.1/10/11 offers a 7-day free trial which is quite enough to test and understand the software. Both tools have pros and cons – you must pick one of your choices.
If you want to restore Time Machines backups to Windows 7/8.1/10/11 frequently and don’t want to install Java on your device, then HFS+ for Windows 7/8.1/10/11 is the best Option. But paying for something which comes for free doesn’t make sense. So, we’ll use the free solution using HFS Explorer with the only downside of installing Java.
This solution to view Time Machine backups on Windows 7/8.1/10/11 works on all popular versions, including Windows 7/8.1/10/11.
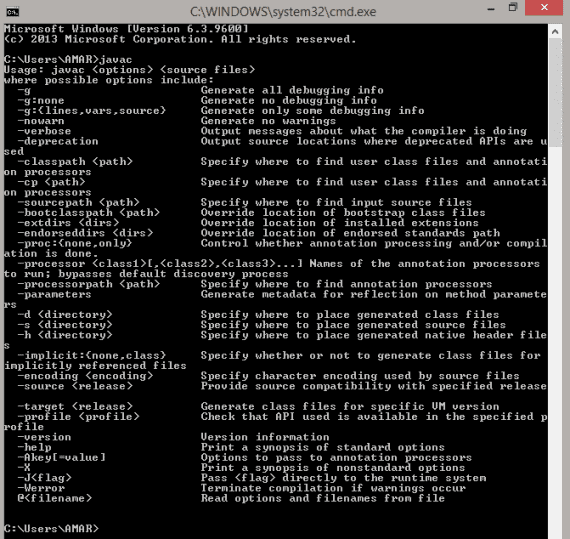
1. Download Java and set the PATH variable
To use HFS Explorer, you must first download Java and install it on your device. After installing JAVA, you must set the Java path properly to let your Windows 7/8.1/10/11 know where Java is currently installed. To set the path, you need to open Environment Variables under the Advanced Settings of My Computer and create a path variable under User variables.
To confirm whether you have installed and configured Java correctly, type javac in the command prompt, which prints the output as shown in the image below.

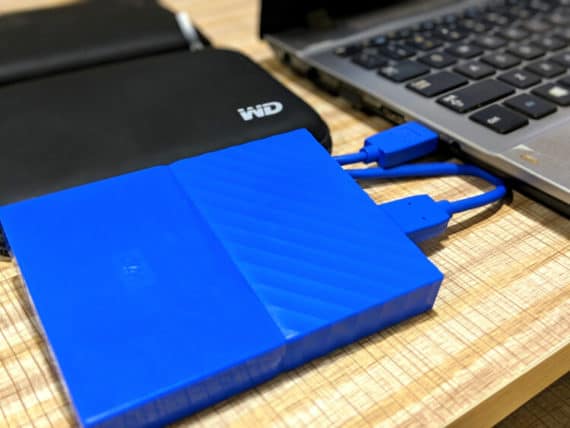
2. Connect Hard Drive to Your Windows 7/8.1/10/11 PC/Laptop
The first step to accessing Time Machine backup files on Windows 7/8.1/10/11 is connecting your Mac formatted hard drive to your Windows 7/8.1/10/11 machine using the USB cable. You might need to use adapters if your hard drives come with a Thunderbolt cable, which is very rare.

As we already know, Windows 7/8.1/10/11 will fail to recognize the hard drive as it is an HFS+ formatted device. If you don’t know, your Mac can read file systems of Windows 7/8.1/10/11 (NTFS/FAT32), but your Windows machine cannot read the file systems of OS X (HFS/HFS+HFSX).
3. Install HFS Explorer
After installing and configuring Java successfully, you need to download and install HFS Explorer to view Time Machine backups on Windows 7/8.1/10/11. After installing HFS Explorer, you might see a dialog box on your screen asking you to format the connected external hard drive. You should cancel it carefully and never format the device.
Being said that, open HFS Explorer (as Administrator) by double-clicking the shortcut icon on the Desktop. After opening it, select the File menu and choose “Load file system from the drive. “HFS Explorer is smart enough to detect your connected external drive, which is in HFS+ format. If it fails to pick the device, you must manually choose it from the “Detected Devices” drop-down box.
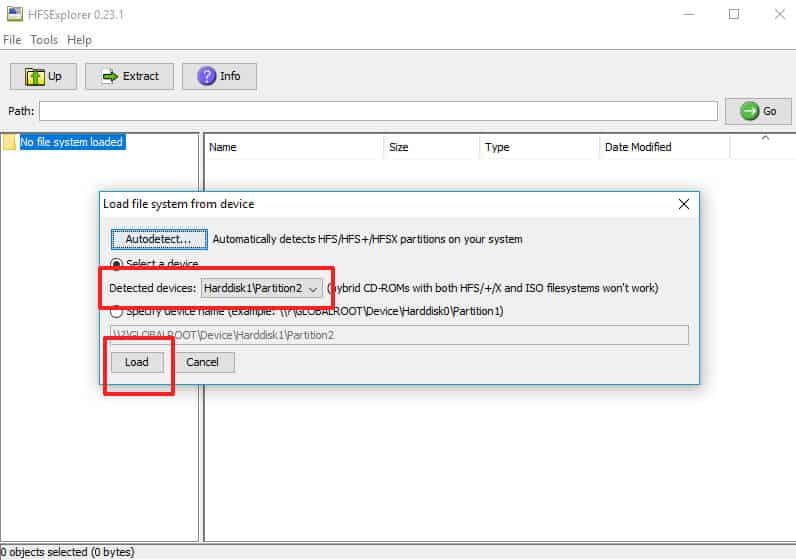

Once you choose the correct drive, click Load, which will list all the file contents of a hard drive containing Time Machine backups.
4. Restore Time Machine Backup Files to Windows 7/8.1/10/11
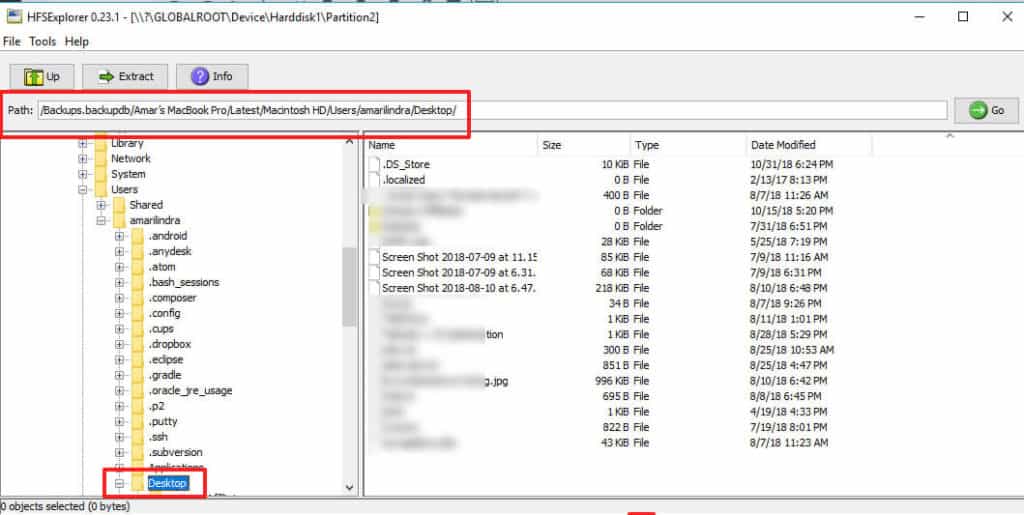
You need first to understand the file hierarchy of Time Machine backup files to navigate through the desired folder. After listing the files on the hard drive, you will find a folder named “Backups. backupdb” in the root folder.
Inside Backups. backupdb folder, you will see another folder with the name of your MacBook. In my case, it is “Amar’s MacBook Pro.” Open it to see all your recent Time Machine Backups created on different dates. The recent Time Machine backup will be named “Latest. “However, you can also choose older backups if you want to see the older files.
To view your files, open the folder named Latest, navigate to Macintosh HD – Users, and open the amarilindra (your username) folder. Here is where you can see all your Downloads, Desktop files, Music, Pictures, Documents, and more.

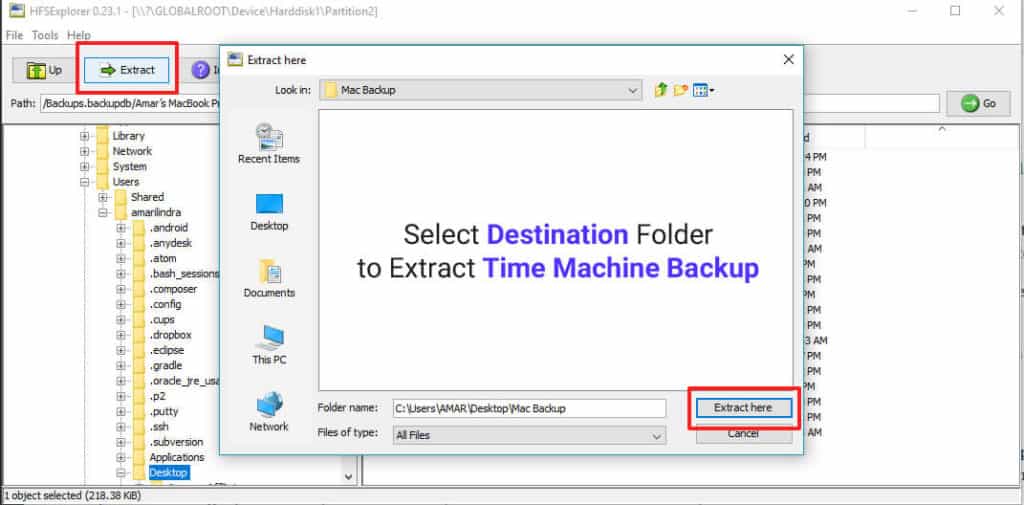
To restore the entire Time Machine backup to your Windows 7/8.1/10/11, navigate to the backup folder and click on the Export button. Choose the destination folder in your Windows 7/8.1/10/11 device and HFS Explorer will export and copy the Time Machine backup to Windows 7/8.1/10/11 automatically.

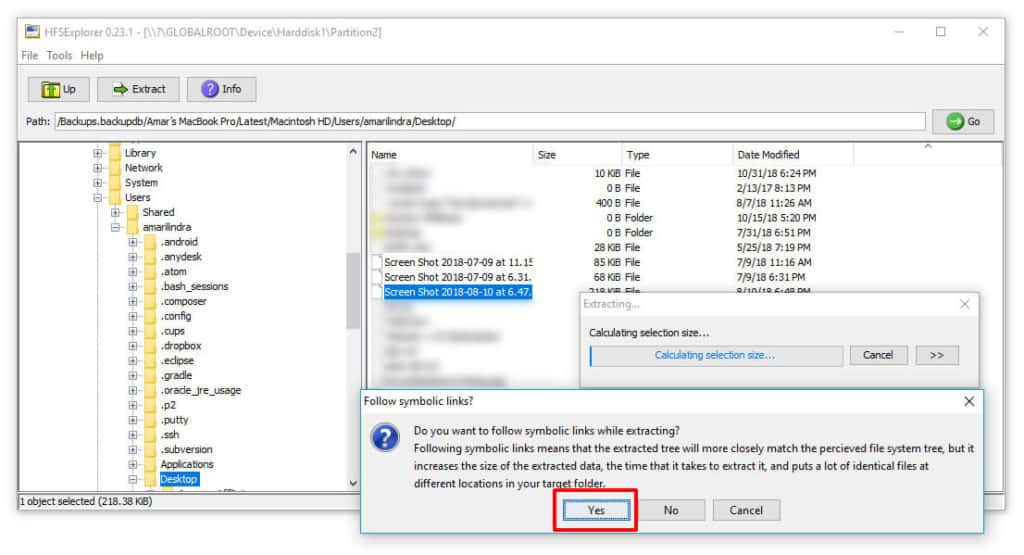
If you want to export only a few folders or files from Time Machine backup, navigate to the required folder, choose the file(s), and hit the Export button. Your selected files and folders might have symbolic links, and HFS Explorer follows the same. Don’t worry; allow HFS Explorer to follow symbolic links, which will take care of copying Time Machine files to Windows 7/8.1/10/11. You might see duplicate files being copied due to symbolic links, and you must manually delete them later.

Use Mac Formatted HFS+ Files System External Drives on Windows 7/8.1/10/11
This is how you can copy Time Machine backups to Windows 7/8.1/10/11 PC or laptop without formatting or data loss. The drawback of this method is you have to install Java on your device. If for some reason, HFS Explorer didn’t work on your device or if you don’t like installing Java, then HFS+ for Windows by Paragon will be the best choice for you.
Usually, OS X uses the FAT32 file system for regular usage devices like pen drives, memory cards, etc., which is supported by Windows but in some individual cases, like Time Machine backups, it uses the HFS+ file system. This is when you need Windows tools that can open HFS+ file systems. Though you can connect, access, view, and export Time Machine backups to Windows using HFS Explorer, you can not still edit and write the files. You have just read-only access.
Another workaround to access Time Machine backup files in Windows is by connecting your hard drive to another MacBook or iMac and copying the data to a portable device with the FAT32 file system accessible in Windows 7/8.1/10/11. But this is not preferable for everyday tasks as it kills a lot of your time. So the ideal solution to view Time Machine backups on Windows is using HFS Explorer and Java runtime or buying HFS+ for Windows 7/8.1/10/11 by Paragon. If you choose the free solution and install Java on your machine, you must also consider disabling Java on web browsers for various security benefits.
Back up your Mac with Time Machine
Learn how to create a backup of the files on your Mac.
You can use Time Machine, the built-in backup feature of your Mac, to automatically back up all of your files, including apps, music, photos, email, documents, and system files. When you have a backup, you can restore files if the original files are deleted from your Mac or the hard disk (or SSD) in your Mac is erased or replaced.
Create a Time Machine backup
You only need an external storage device to create backups with Time Machine. After you connect the device and select it as your backup disk, Time Machine automatically makes hourly backups for the past 24 hours, daily backups for the past month, and weekly backups for all previous months. The oldest backups are deleted when your backup disk is entire.
Connect an external storage device
Connect one of the following external storage devices, sold separately.
- External drive connected to your Mac, such as a USB, Thunderbolt, or FireWire drive
- External drive connected to an AirPort Extreme Base Station (802.11ac model) or AirPort Time Capsule
- AirPort Time Capsule
- Mac shared as a Time Machine backup destination
- Network-attached storage (NAS) device that supports Time Machine over SMB
Select your storage device as the backup disk
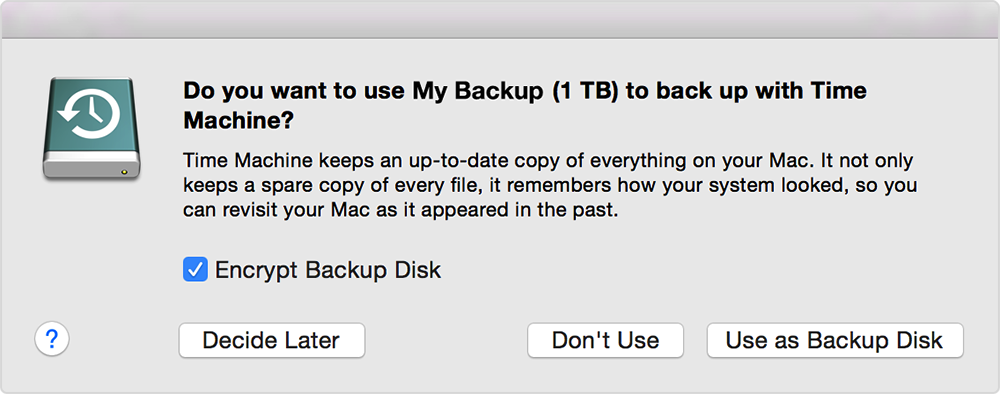
When you connect an external drive directly to your Mac, you might be asked if you want to use the drive to back up with Time Machine. Select Encrypt Backup Disk (recommended), then click Use as Backup Disk.
An encrypted backup is accessible only to users with a password. Learn more about keeping your backup disk secure.

If Time Machine doesn’t ask to use your drive, follow these steps to add it manually:
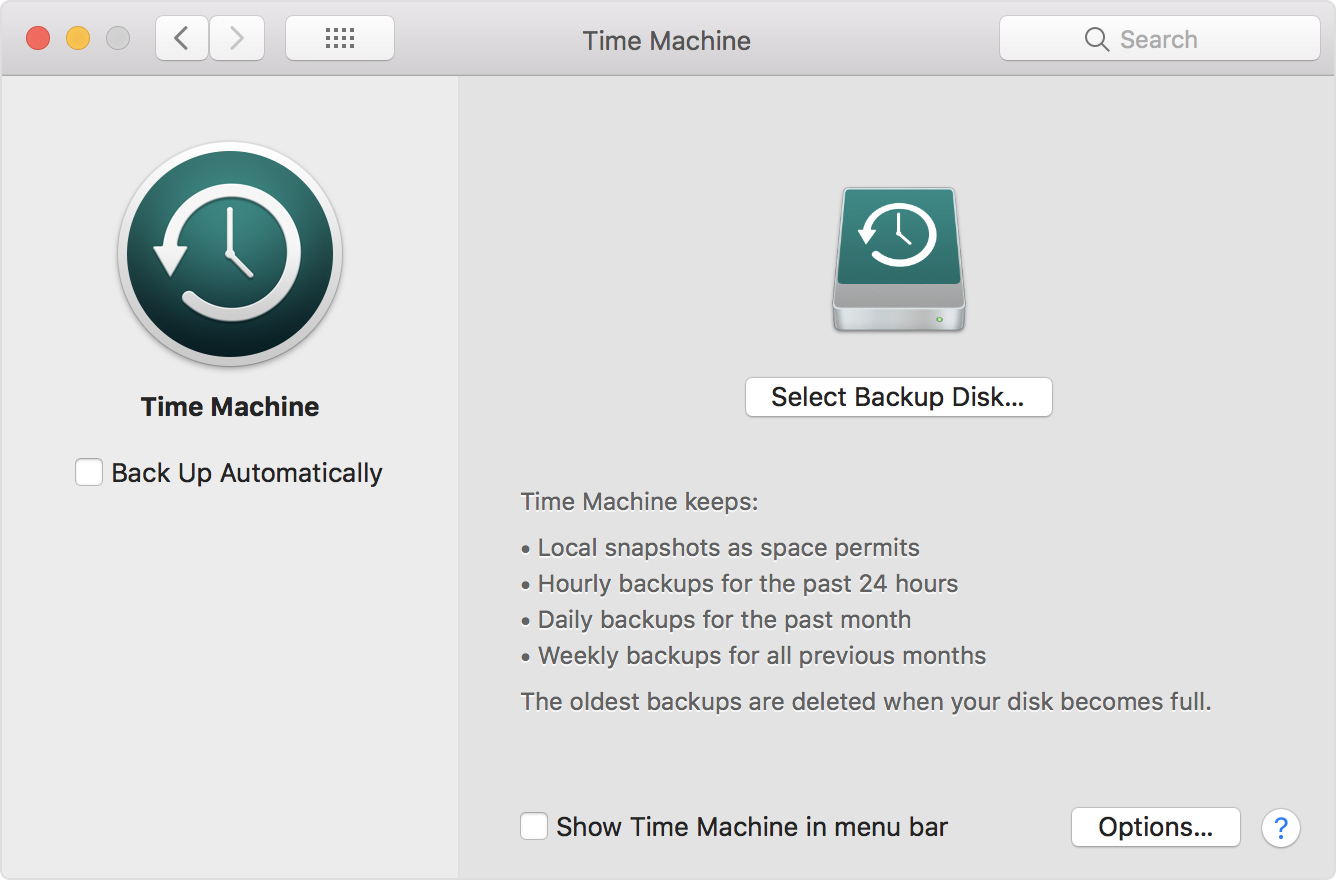
- Open Time Machine preferences from the Time Machine menu in the menu bar. Or choose Apple () menu > System Preferences, then click Time Machine.
- Click Select Backup Disk (or Select Disk, or Add or Remove Backup Disk):
- Select your external drive from the list of available disks. Then select” Encrypt backups” (recommended) and click Use Disk:
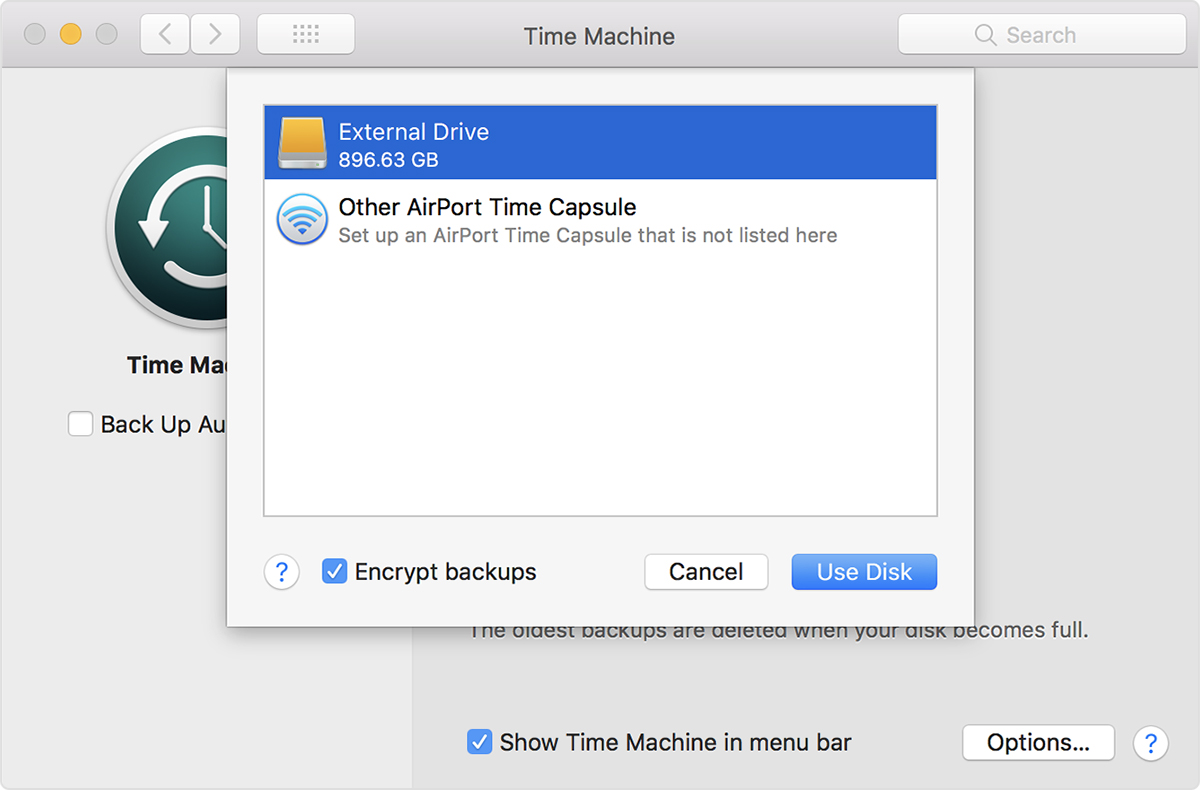


If the disk you selected isn’t formatted as Time Machine requires, you’re prompted to erase the disk first. Click Erase to proceed. This erases all information on the backup disk.
Enjoy the convenience of automatic backups.
After you select a backup disk, Time Machine immediately begins making periodic backups—automatically and without further action by you. The first backup may take a long time, depending on how many files you have, but you can continue using your Mac while a backup is underway. Time Machine backs up only the files that have changed since the previous backup so that future backups will be faster.


To start a backup manually, choose Back Up Now from the Time Machine menu in the menu bar. Use the same menu to check the status of a backup or skip a backup in progress.
Learn more
- Restore your Mac from a backup
- Other ways to back up and restore files
- If you back up to multiple disks, you can switch disks before entering Time Machine. Press and hold the Option key, then choose Browse Other Backup Disks from the Time Machine menu.
- To exclude items from your backup, open Time Machine preferences, click Options, then click the Add (+) button to add an item to be excluded. To stop excluding an item, such as an external hard drive, select the item and click the Remove (–) button.
- If using Time Machine to back up to a network disk, you can verify those backups to ensure they’re in good condition. Press and hold the Option, then choose Verify Backups from the Time Machine menu.
- In OS X Lion v10.7.3 or later, you can start up from your Time Machine disk, if necessary. Press and hold the Option as your Mac starts up. When you see the Startup Manager screen, choose “EFI Boot” as the startup disk.
Author’s Opinion regarding the Time Machine For PC Windows 7/8.1/10/11 (32-bit or 64-bit) & Mac
The Time Machine For PC has powerful features while considering the security purpose; priority is very high. No VPN or RDP is required for the said purpose. In some cases, the emulator also works fine, and middleware software also has a vital role in smooth functioning. Therefore, the author recommended the Time Machine For PC for your personal use and has no issue regarding the installation on PC (Windows 7/8.1/10/11 and Mac). I hope you also use it without any trouble; if you have any issues, please mention them in the email, and we will provide you with proper solutions. Please like and share with others. We made a lot of effort while collecting the software for your download.