Android Operating System For PC (Windows 11,10,8.1,7) & MAC
Wondering if you could utilize the Android Operating system for PC? Well, you have come to the right place on the Internet. It is certainly possible for you to have Android running on your PC. We have tried and tested some best Android OS for PC, but getting the same seamless experience on a PC is very tough compared to an Android smartphone.
Here, we will discuss the best ways you can use the Android OS on a PC. Do note that there is no full-fledged Android OS for PC; the patterns or methods mentioned here would only help you run it on your PC to help you achieve basic tasks.
Is there a Problem Installing Android Desktop OS?
Compared to a full-fledged desktop OS, Android as a desktop OS lacks much functionality. For instance, you can’t manage the printers, and it also does not support keyboard-centric interfaces as other desktop OSs do. Moreover, it does not help quite a few advanced desktop-centric technologies, considering that you may have high-end hardware equipped.
The Android Operating System for PC is a customized version of the popular mobile OS designed to run on personal computers and laptops. Developed by various third-party developers, these custom Android builds provide users with the opportunity to experience Android’s user-friendly interface and vast app ecosystem on a larger screen. With the Android OS for PC, users can access their favorite Android apps, games, and productivity tools, providing a familiar and versatile computing experience.
These Android OS versions for PC often come with optimizations to ensure compatibility with a wide range of hardware configurations, making them suitable for both older and newer PC systems. Users can install the Android OS as a standalone operating system on their computers or use virtualization software to run it within their existing OS. This flexibility allows users to seamlessly switch between Android and their primary OS as needed.
Latest Version
In a nutshell, Android desktop OS will give you an incomplete desktop experience. So, it would help if you considered running the Android OS through some emulators or as virtual machines using VMware.
Best Android OS for PC
Bluestacks
Bluestacks is an Android emulator to run apps and games on your PC. It is our best bet if apps and games are the only stuff you care about when running an Android OS for a PC. It is the easiest and most reliable method among all the others that we will discuss in this article.
You need to head to their official site and download the setup file. There’s no advanced setup required. You are just a click away after installing it. Also, with Bluestacks, you don’t need to worry about your hardware configuration. It will automatically detect your design to optimize the performance as per the requirement. It would be best to focus on the apps and games without worrying about the configuration.
Android x86 Project
Android x86 is one of the most popular projects to realize as the Android OS for PC. It is an unofficial initiative by a group of developers (now grouped as a significant community) to port Android OS for PC. It is based on AOSP with a few tweaks to make it compatible with the PC hardware (or architecture). You should be good to go if you have an Intel-powered machine. We are not sure about AMD-based chips for Android x86. Although, they are working to enable OpenGL ES hardware acceleration for Intel/Radeon/Nvidia/ (pstglia, Mauro) and viral (robe) GPUs, as mentioned in their roadmap.
But how do you install this on your PC? Is it the best Android OS for PC? Just as you would for any other OS, you need to download the ISO file from the download section of their official site and look for the correct ISO file (32-bit or 64-bit), and then initiate the download.
It is straightforward to have it installed. You can use the ISO file to directly run it live from the USB drive or install it through VMware. It does support dual boot, but we would not recommend having it installed on your production PC (unless you have a PC specifically for experiments and stuff). You should contribute to the project (or donate) if it works for you just fine – because this is an optimistic project which could make Android OS a full-fledged OS for desktops possible very soon. The Android x86 project is based on Android Nougat 7.1 and Android Oreo.
Pheonix OS
Pheonix OS is based on the Android x86 project (somewhat) and is another best Android OSs for PC option. However, it has been customized for a different user experience and comes baked in with known bloatware (in the Chinese language – that’s the origin of it). If you do not mind the added bloatware, it should be fine to use on a desktop. However, considering a lot of modifications have been made here, we would not recommend doing something meaningful while having Pheonix OS installed.
Pheonix OS may prove to be one of the best Android desktop UIs. You should try installing it as a virtual machine because it isn’t very secure to access your emails or perform a transaction – it is only helpful if you like to experiment with it with no sensitive information associated.
Samsung Dex
Samsung Dex is a very professional alternative if you want an Android desktop experience at your workplace. This isn’t cut if you are wondering how to install Android on a PC or laptop. Get the Samsung Dex dock station for 150 USD and get going. You may utilize it at home, but it would prove to be inconvenient, requiring you to have a spare monitor, mouse, and keyboard – only for Samsung Dex. In either case, it would also be annoying to disconnect your existing monitor, keyboard, and mouse from your desktop PC to use it with Samsung Dex.
So, it feels like a viable solution for corporate usage where the company only needs monitors, keyboards, mice, and Bluetooth speakers to be assembled without worrying about the system – which will be essentially replaced by the Samsung Dex coupled with a Galaxy S8/S8+ or Note 8 smartphone. Samsung Dex provides a polished user interface with a lot of functionality. You get HDMI, USB 2.0, USB Type C, and Ethernet ports available on it.
Of course, we recommend this if you already own a Galaxy S8/S8+ or the Note 8. The 150 USD investment to get one of the best Android OS for PC is worth it – unless you are okay with experimenting with crazy stuff with the Android x86 project.
How to Install Complete Android OS on a PC Window 7/8.1/10/11 (32-bit or 64-bit) & Mac
When people think of running Android on a PC, they often think of emulators. But today, I will show you how to install Android as a complete operating system on your PC. This has tremendous benefits over simply running an Android emulator on your desktop.
For one, the Android OS can take complete advantage of your system hardware, whereas an emulator shares CPU / RAM resources with the native OS environment. This means that Android apps and games will run flawlessly and buttery smooth on PC hardware when Android is installed as its OS.
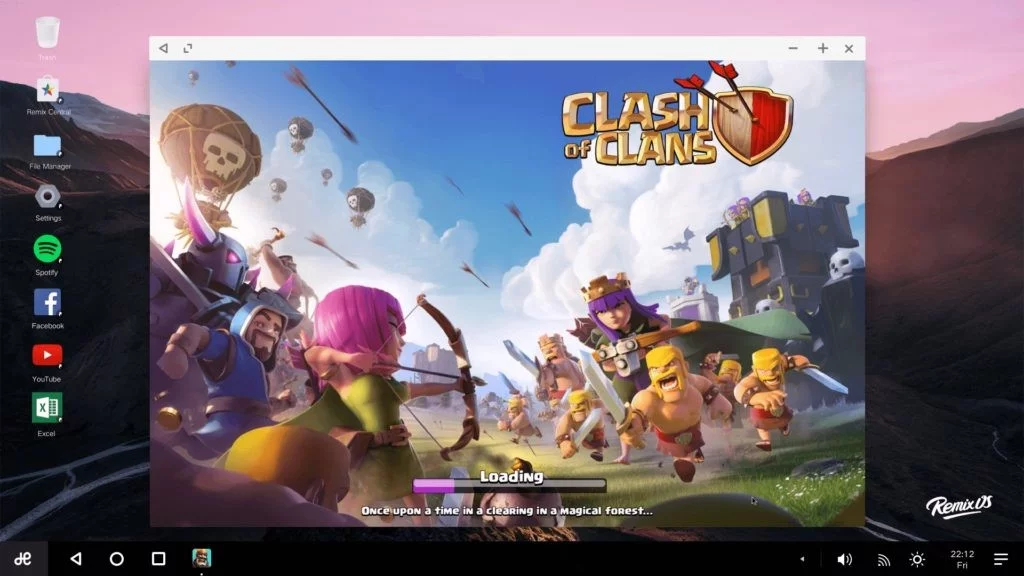
Imagine all your favorite Android apps and games running flawlessly on your 32″ PC monitor, with mouse and keyboard support. I shouldn’t need to explain how awesome this is for games like Clash of Clans or Mobile Legends. If you’re already drooling at the bit, read on as I’ll walk you step-by-step through installing the Android OS on your PC.
Note: I am using Remix OS for this guide but have linked to other Android-for-PC options. But Remix OS is the best, in my opinion, and the latest versions come pre-rooted, so you can immediately start installing all your favorite root apps.
Requirements
- Android OS made for PC: You have several options here – the most popular is Remix OS and Phoenix OS. You can also try x86 Project or OpenThos, but I’ll use Remix OS for this guide because it’s highly optimized for PC hardware compatibility.
- A formatted USB drive with at least 8GB storage (optional, for bootable USB method)
.Exe Package Installation Method
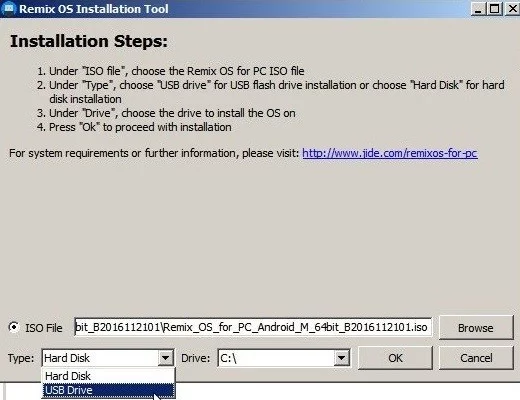
There are two methods of installing Remix OS. If you’re running Windows 7/8.1/10/11, you can use the .exe installation tool. Just grab the 64-bit or 32-bit package from the Remix OS download page, launch the installation tool .exe, and follow the on-screen instructions.
Now, you can install Remix OS to your HDD, allowing you to dual-boot between Windows 11/10/8.1/7 or Remix OS without a USB. Or you can install Remix OS directly onto a USB drive, creating a portable OS, and you’d need to boot from USB in your BIOS / UEFI menu.
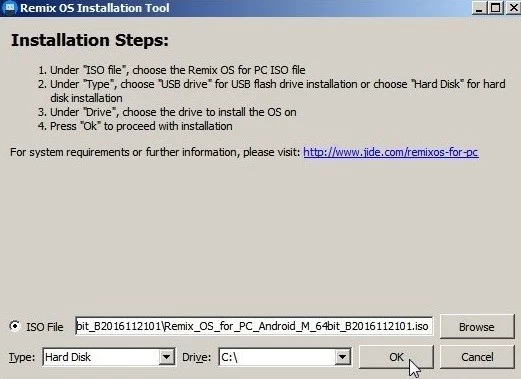
Choose Hard Disk or USB installation, depending on if you prefer a dual-boot system or a portable OS that will boot from USB.
PRO TIP: If the issue is with your computer or a laptop/notebook, Reimage Plus can scan the repositories and replace corrupt and missing files. This works in most cases where the issue originated due to system corruption.
When it’s done, reboot your PC and enter the UEFI boot menu. Hit the correct key during the boot sequence to enter the UEFI menu: F12 for Dell, F9 for HP, F12 for Lenovo, and Option Key for MAC.
Disable “Secure Boot” if it’s turned on, and select Remix OS from the boot menu. That’s it!
Single-Boot USB Method
This method is for installing Remix OS as a single-boot OS. This means that Remix OS will be the only operating system on your PC. Since Android is designed to run smoothly on devices with low amounts of RAM and CPU power, you could bring life back to an old desktop PC. People report Remix OS running buttery smooth on desktop PCs with as little as 1GB of RAM.
You’ll need software that can burn/write.ISO files to USB and create a bootable USB –
You’ll also need a 3rd-party partitioning software that can partition your HDD from the boot, like Hiren’s BootCD. Burn the. ISO from Hiren’s BootCD onto a CD or USB. For creating a bootable. ISO on CD, use Free ISO Burner or IMGBurn.
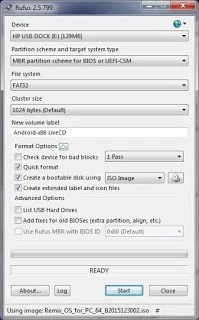
For creating a bootable USB for the Remix OS installer, use Rufus, which I mentioned before. In Rufus, make sure the following settings are enabled:
- File system: FAT32
- Quick format
- Create a bootable disk using an ISO image
- Create extended label and icon files
Do not attempt to create a bootable CD for Remix OS, even if you made a bootable CD for Hiren. Use Rufus to create a USB!!
Now boot your computer into the UEFI / boot menu, choose the drive for the Hiren BootCD you made, and then choose “Parted Magic.” Launch GParted and create a new Partition Table and an ext4 partition using all available HDD space. Save/Apply and reboot your PC into the UEFI / boot menu again.
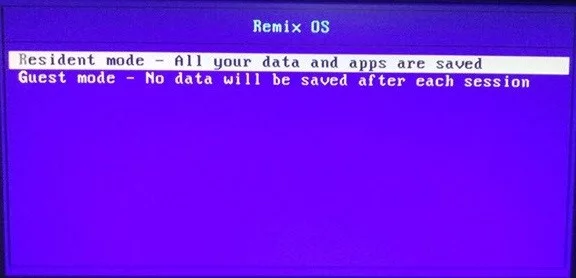
Now choose the USB drive containing your Remix OS installer. A Grub Boot Menu will appear, so press E on your keyboard when Resident Mode is highlighted.
- Now set the boot flag to INSTALL=1. You need to look for SRC= DATA= CREATE_DATA_IMG=1 and change it to SRC= DATA= INSTALL=1
- An installer wizard will appear, so follow along closely now.
- Choose the target drive for the OS installation – usually, it will be sda1.
- Choose “Do not format” and agree to “install Grub Boot Loader.” Also, choose not to allow read/write permissions for the /system folder.
- Press ENTER key, and the installation will begin. Grab a coffee, and reboot your PC when it’s all done. Now grab another coffee because the first time booting Remix OS will take around 15 minutes.
- You’ll be taken to the Setup screen when it’s done, almost like turning on a brand-new phone. You’ll select your language, user agreement, WiFi setup, activate your Google account, etc.
- Enjoy your new Android operating system on your PC!
Wrapping Up – Android OS for PC Windows 7/8.1/10/11 (32-bit or 64-bit) & Mac
You may find a lot of Android distros available for PC. But, only a few of them (the ones mentioned in the article) does the trick being the most tried and tested methods to get the Android operating system for PC. If you are someone who does not like handling an ISO file with a virtual machine setup, Bluestacks or Samsung Dex is the way to go. If you are all right using virtual machine setups, you can try either the Android x86 project (recommended) or the Pheonix OS.
Let us know your thoughts on improving Android as a desktop environment, the best methods you follow, and some interesting Android desktop OSs we didn’t know about in the comments below.
Author’s Opinion regarding the Android Operating System For PC Windows 11/10/8.1/7 (32-bit or 64-bit) & Mac
The Android Operating System For PC has compelling features while considering the security purpose; priority is very high. No VPN or RDP is required for the said purpose. In some cases, the emulator also works fine, and middleware software is vital for smooth functioning. Therefore, author recommended the Android Operating System For PC for your personal use and has no issue regarding the installation on PC (Windows 7/8.1/10/11 and Mac). I hope you also use it without any trouble. If you have any problems, please mention them in the email, and we will provide you with proper solutions. Please like and share with others; we made a lot of effort while collecting the software for your download.